Setting Up the Development Environment
(Previous Page: Docker Tutorial)
The goal of this section is to set up your development environment so you are able to build Docker images. We have instructions for doing this on Google Cloud Platform (GCP) and your own machine.
If you choose to use GCP, the tutorial will explain how to launch a pre-configured virtual machine (VM) with a GPU that already has all of the necessary dependencies installed for building Docker images. You can then ssh into them to develop the Docker image for your code. These cloud machines will very closely replicate the environment which we will use to run your Docker images when you submit them.
If you choose to instead use your local machine, we will provide resources which explain how to install and run Docker locally.
1 Development Environment
If you want to use GCP, please follow the instructions in Section 1.1. If you want to install it on your own machine, please follow the instructions in Section 1.2.
1.1 Google Cloud Platform
This tutorial assumes that you already have a Google Cloud Platform account. If not, please register here.
Creating the Instance
We will launch an instance of a VM that is pre-configured to have Docker and the correct NVIDIA drivers installed. After it has been created, you will be able to ssh into the machine in order to build Docker images without any additional setup.
-
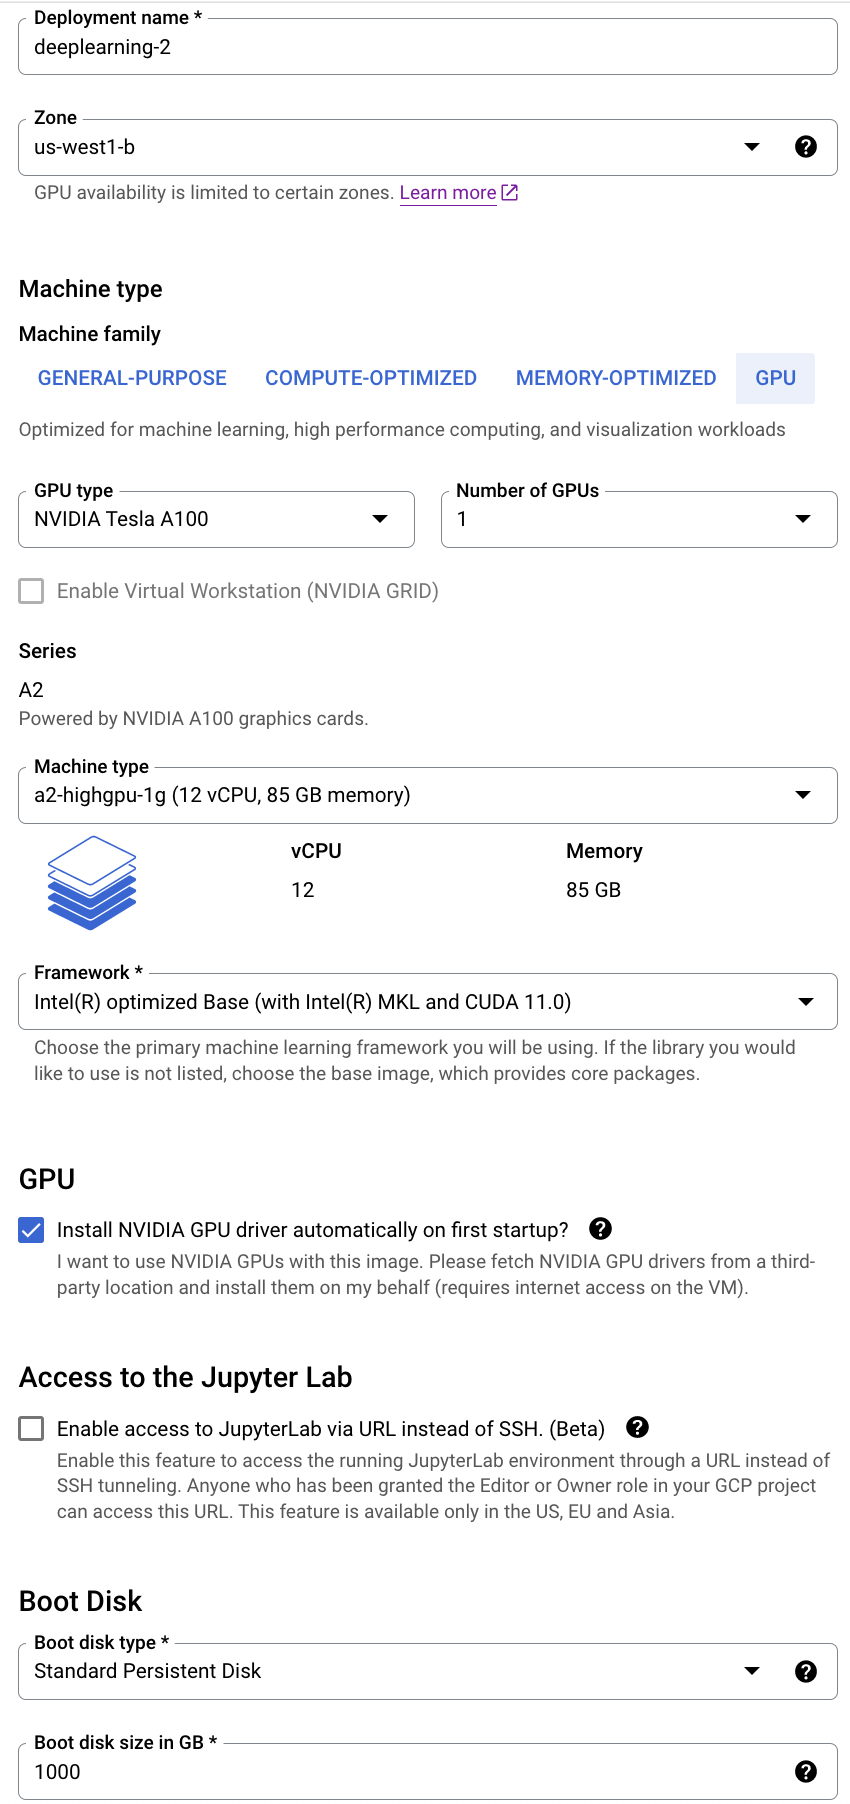
Navigate to this page and select “Launch” to configure a new GCP instance. Follow the steps below to configure the machine. A screenshot of the target configuration is available here.
-
Enter the name you want to use for your VM under “Deployment name.”
-
Select the region of the world you want the VM to be hosted under “Zone.” Typically you want to select a region which is physically closest to where you are. However, we will configure the machine to have an A100 GPU, and those GPUs are not available in all regions, so we recommend picking region somewhat physically close to you that will allow you to select an A100 GPU (see this link for regions with A100 GPUs available). For the purposes of building the Docker images, the zone is not very critical, so do not worry if you have to pick a region which is not close to you.
-
Under “Machine Family,” ensure “GPU” is selected. We have seen that if the width of your web browser is too narrow, the “GPU” option is hidden behind other UI elements on the page. If you don’t see this option, try making the browser wider.
-
When you submit your Docker image to the Reproducibility Track, we will run it using a single NVIDIA Tesla A100 GPU. Therefore, for “GPU type,” we recommend “NVIDIA Tesla A100” and setting the number of GPUs to 1. If the form raises an error that A100 GPUs are not available in your selected region, change the region to one which does have A100 GPUs even if it is not physically close to you.
-
For machine type, select “a2-highgpu-1g,” which is the same machine type which we will use to run your image.
-
Under “Framework,” select “Intel(R) optimized Base (with Intel(R) MKL and CUDA 11.0)”
-
Check the box to “Install NVIDIA GPU driver automatically on startup”
-
Under Boot Disk, you can select “Standard Persistent Disk” and set the size of the disk based on your needs. When we run your image, there will be a 1 TB disk.
At this point the machine setup is configured, and the right side of the page should show you the estimated monthly cost of your configuration. Remember to stop your instance when it’s not in use to avoid unnecessary charges.
Hit “Deploy” at the bottom to create your image.
If successful, you should be able to see your machine at https://console.cloud.google.com/compute/instances.
Accessing the Instance
The easiest way to access the instance is through GCP’s in-browser ssh tool. From the instance console, first start your created instance (if it is not already running). Then click the “SSH” button to access the machine.
We have run into permissions issues with Docker and GCP instances if you manually ssh into the instance using an ssh key. Therefore, we recommend using the in-browser option.
If you log into the machine and it asks about whether the NVIDIA drivers should finish installing, say yes.
You can now proceed to Section 2.
1.2 Your Own Machine
If you choose to run Docker on your own machine, there are two options for installing Docker: with root access and without root access.
If you do have root access on your machine, the easiest way to install Docker is by following the official instructions.
If you do not have root access, you can install the rootless version following the instructions here. However, doing so will require someone who does have root access to help with the setup, for example, from someone in your university or company’s IT department. Once the configurations which require root access are done, you can run Docker commands without requiring root access.
Once you have Docker installed, you can proceed to Section 2.
2 Verifying Your Setup Works
Here, we verify that your configuration works by building and running example Docker images.
First, log in to the machine that you will use to develop your Docker image. Run the following code:
# Create a new directory
mkdir docker-test
cd docker-test

# Create a very simple Dockerfile which is just the
# official Python 3.7 image
cat > Dockerfile << EOL
FROM python:3.7
EOL

# Build the Docker image and call it "docker-test"
docker build -t docker-test .

# Run the image with an interactive shell
docker run -it docker-test /bin/bash
If successful, you should be able to now run commands within the Docker container, for example, by confirming the Python version is 3.7:
python --version
To exit the container, run exit.
Now we will confirm your Docker images can access the GPU. Run the following code from the host machine (not within the Docker container from the previous test):
# Exit out of the "docker-test" directory
cd ..

# Create a new directory
mkdir gpu-test
cd gpu-test

# Create the Dockerfile which will be an image with
# Python 3.7 and the drivers for CUDA 11. We then
# install PyTorch v1.9.0
cat > Dockerfile << EOL
FROM danieldeutsch/python:3.7-cuda11.0.3-base
RUN pip install --no-cache-dir torch==1.9.0+cu111 -f https://download.pytorch.org/whl/torch_stable.html
EOL

# Build the image and call it "gpu-test". This step could run
# for several minutes
docker build -t gpu-test .

# Run the image with an interactive shell,
# adding a the "--gpus device=0" argument to indicate that
# the Docker container should have access to GPU ID 0
docker run -it --gpus device=0 gpu-test /bin/bash
Within the Docker container, run the following commands to verify that the container does indeed have access to the GPU:
# Verify that "nvidia-smi" works
nvidia-smi

# Verify torch has GPU access
python -c "import torch; print(torch.cuda.is_available())"
If the above commands ran successfully, your development environment is correctly set up and you are ready to move on to converting your code base into a Dockerfile.
You can now run exit to terminate that Docker container.